Do not play with fire, kiddo
A friend of mine bought a couple SGI Fuel machines on eBay, some time ago.
He was intending to install IRIX on them and use them as workstations.
However, when he found his IRIX media were too old and didn't support the
non-existing-back-then Fuel systems, it did not take too much to convince him to
lend one of his systems to me, in order to port OpenBSD to this hardware.
And I eventually got my own Fuel machine in time to be able to keep working on this machine after returning the first one back to its owner.
And I eventually got my own Fuel machine in time to be able to keep working on this machine after returning the first one back to its owner.
Pictures
(Click on the pictures to get larger resolution images)
Compared to the other SGI workstation cases, the Fuel is pretty dull. Its red color is quite a departure from the usual blue and green palette used by older workstations (Indigo, Indy, Indigo 2, O2 and Octane), although the first Asterix prototypes (which became Fuel) had their case painted lightblue. The top of the case is flat, unlike the O2 and Octane.
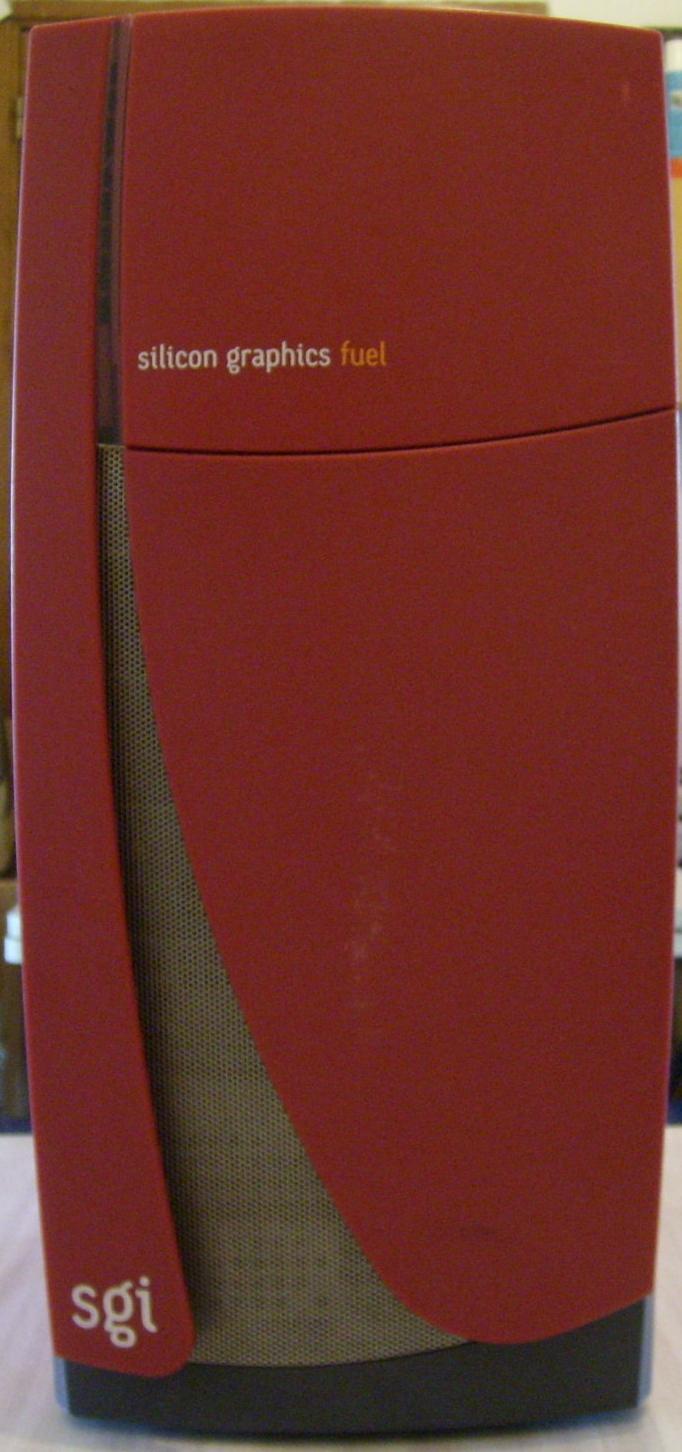

SGI has abandoned the complex sliding door mechanism of the Octane, and
the front door of the Fuel is just rotating.
Beneath the door are the usual power, reset and NMI buttons, as well as two removable 5"1/4 devices (on this particular machine, we have removed the CD-ROM drive, as it was dead, hence the top slot being open).
The sticker on the back of the door is just a reminder of the machines part number and manufacturing date.

All the I/O connectors are located on the back of the system, where you can
also see the huge exhaust fan grid. Oh, and the quick configuration description
written by the eBay seller, which turned out to not even match the contents of
the machine...
Between the connectors panel to the left, and the graphics connectors at the bottom, lie a four slot PCI cardcage. I have put a fast Ethernet card in the lowest slot.
(Oh, and don't be surprised the machine seems to lean towards the left side; one of the five rubber pads under the chassis is gone, and while I had taken the previous pictures with a small wood block under the machine to restore its vertical position, I did not notice the block had fallen when moving the machine to take that picture. I don't think it's worth taking the picture again).
Here is a close-up of the main I/O connectors.
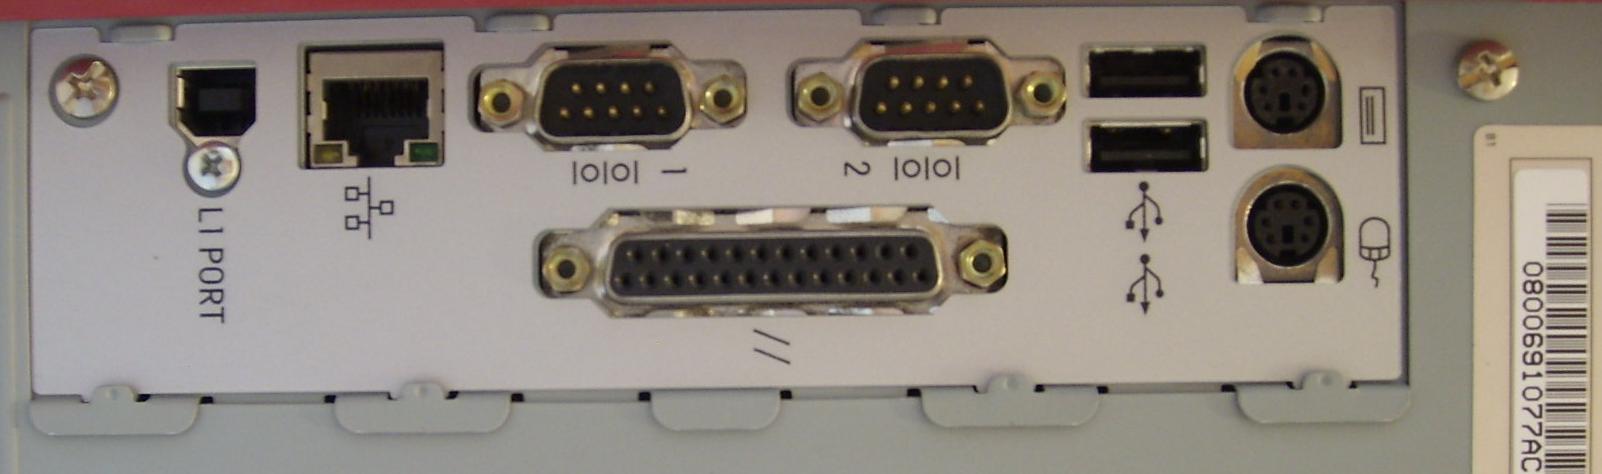
From left to right, they are:
Note the lack of an external SCSI connector. If you want to connect external SCSI devices, you'll need to plug a PCI SCSI controller.
- An L1 console connector (type B USB form factor), to allow this machine to be connected to an L2 controller for remote management.
- A 10/100Mbit/s Ethernet interface.
- Two serial ports.
- A parallel port.
- Two USB connectors.
- Keyboard and mouse PS/2 connectors.
Note the lack of an external SCSI connector. If you want to connect external SCSI devices, you'll need to plug a PCI SCSI controller.

The VPro graphics card can have many connectors, depending on the model;
this one is a ``low-end'' V10 model, with only one DVI output and no
stereo support on its own.
Time to open the machine. Since I don't own it, I did not want to take it
too much apart. As a result I could not get good pictures of the
motherboard and CPU board, but the following pictures are a start...
Unplug two captive screws at the back of the machine, and one of its sides can be removed and let you peek at its contents.
Unplug two captive screws at the back of the machine, and one of its sides can be removed and let you peek at its contents.
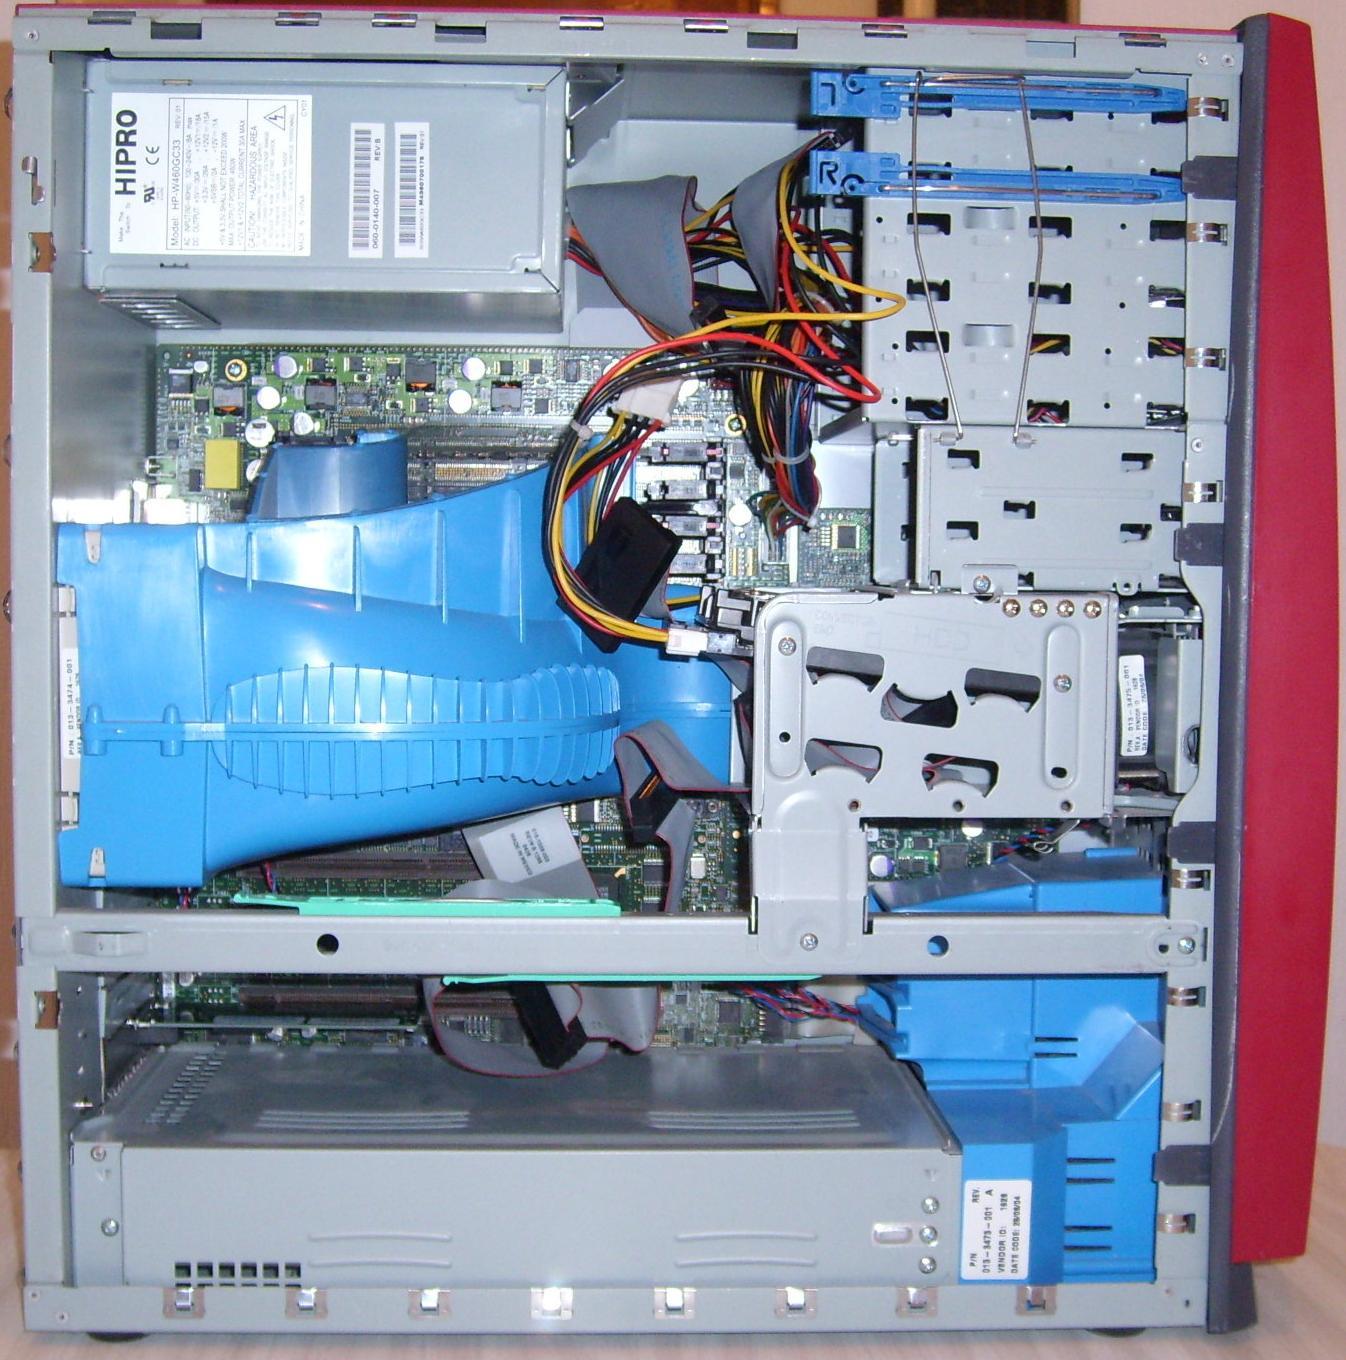
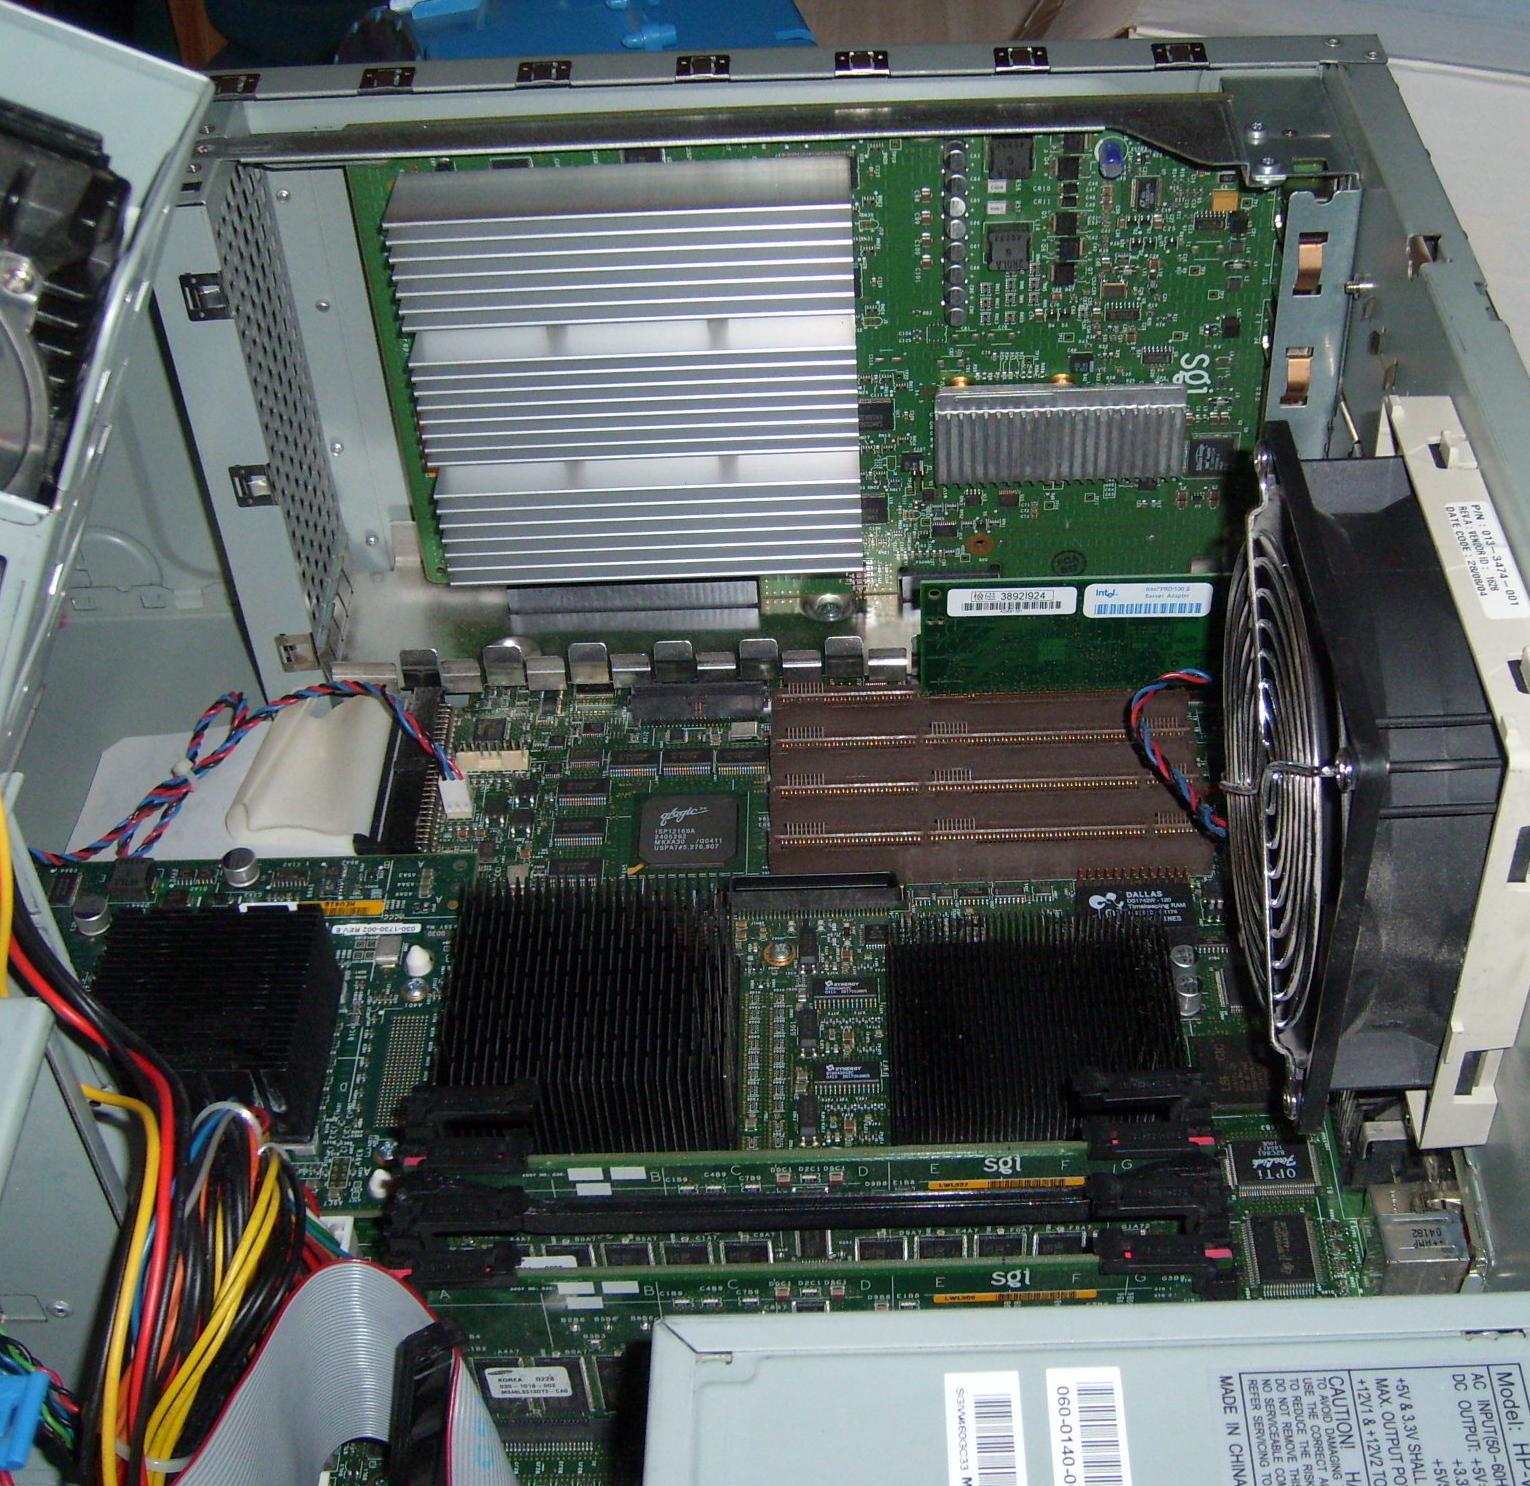
The blue plastic assemblies are airflow guides. They obscure most of the
interesting parts of the motherboard.
At the bottom of the case, the graphics slot is protected by its own enclosure, which is supposedly necessary to avoid electromagnetic interferences.
I'd call SGI's bluff there, but they are probably right. Unless they only intended users to not service this part themselves? (the service manual doesn't mention how to replace the graphics board, yet alone remove the graphics cover - another, seemingly unrelated, manual documents the hidden screw under the chassis, though).

Remove two screws, and the lowest part of the drives cage can rotate. A spring
clip blocks it in position, allowing easier drive maintainance. This position
also allows the airflow guide to be removed. With the internal SCSI cable
removed as well, we can have a first glance at the motherboard.
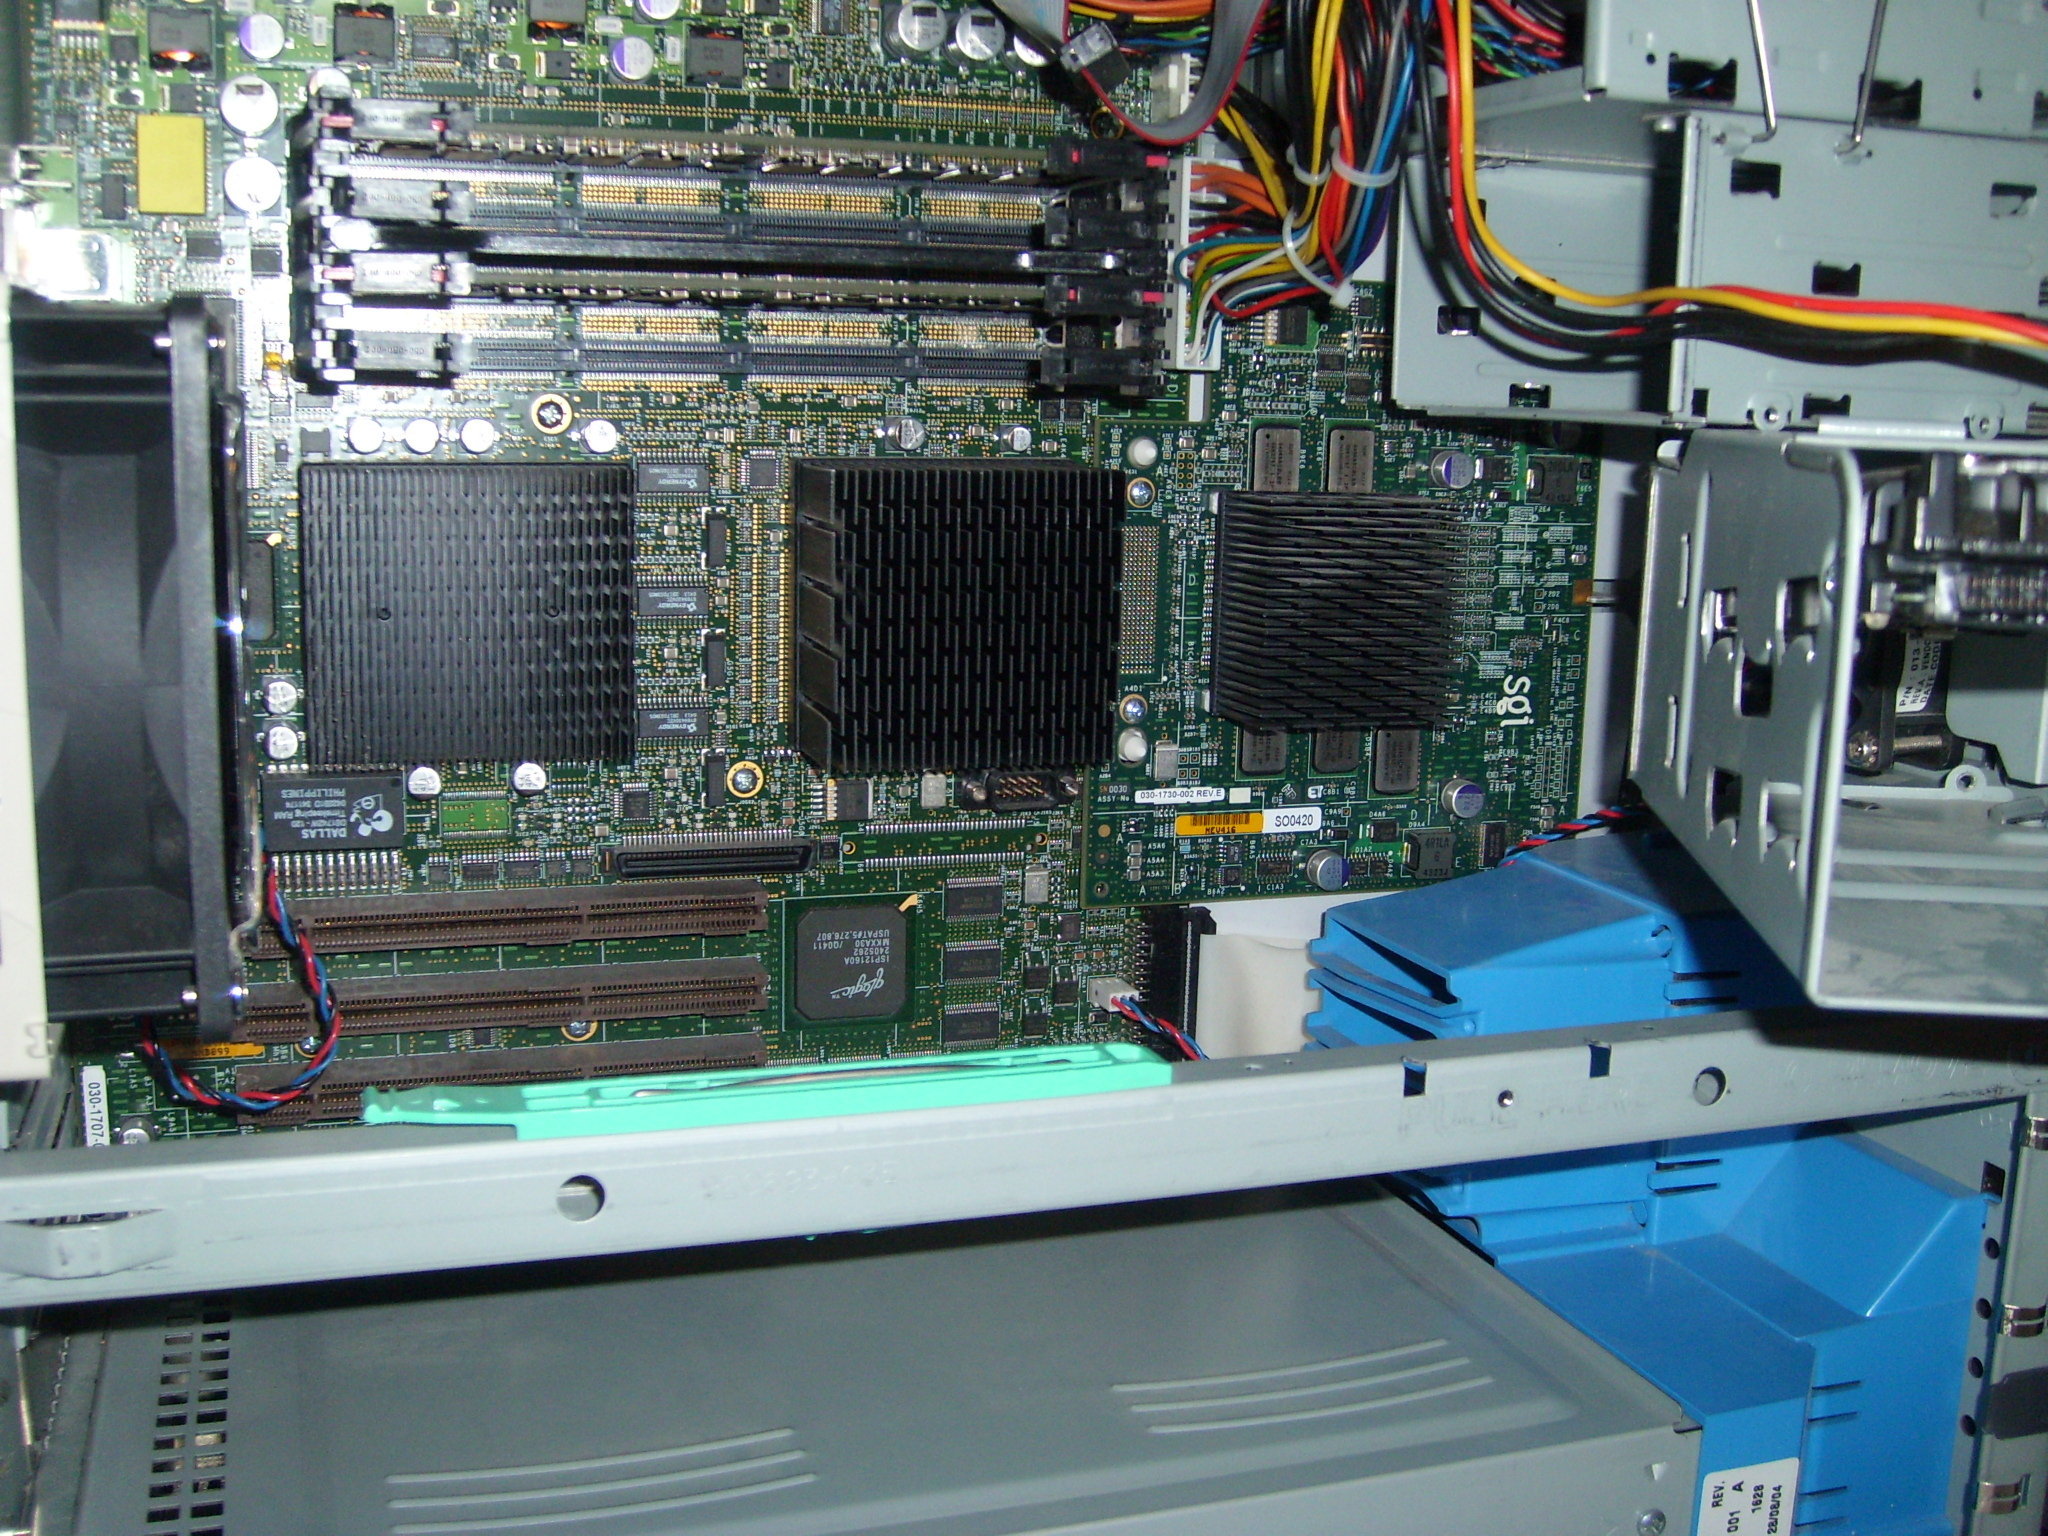
This side view allows you to notice a third black heatsink, slightly smaller,
which was covered by the drive bay on the previous picture.
The two large black heatsinks are probably XBridge ASICs (well, not the heatsinks, but what's beneath them, obviously). The third one is the actual processor. This particular machine uses a 600MHz R14000 processor, with 4MB of cache memory.
Above the heatsink row, one can notice the four memory slots. This machine has four 256MB DDR memory sticks, of which two are missing on this picture. Memory is installed in pairs of 256MB, 512MB or 1GB sticks, allowing up to 4GB of memory in the system.
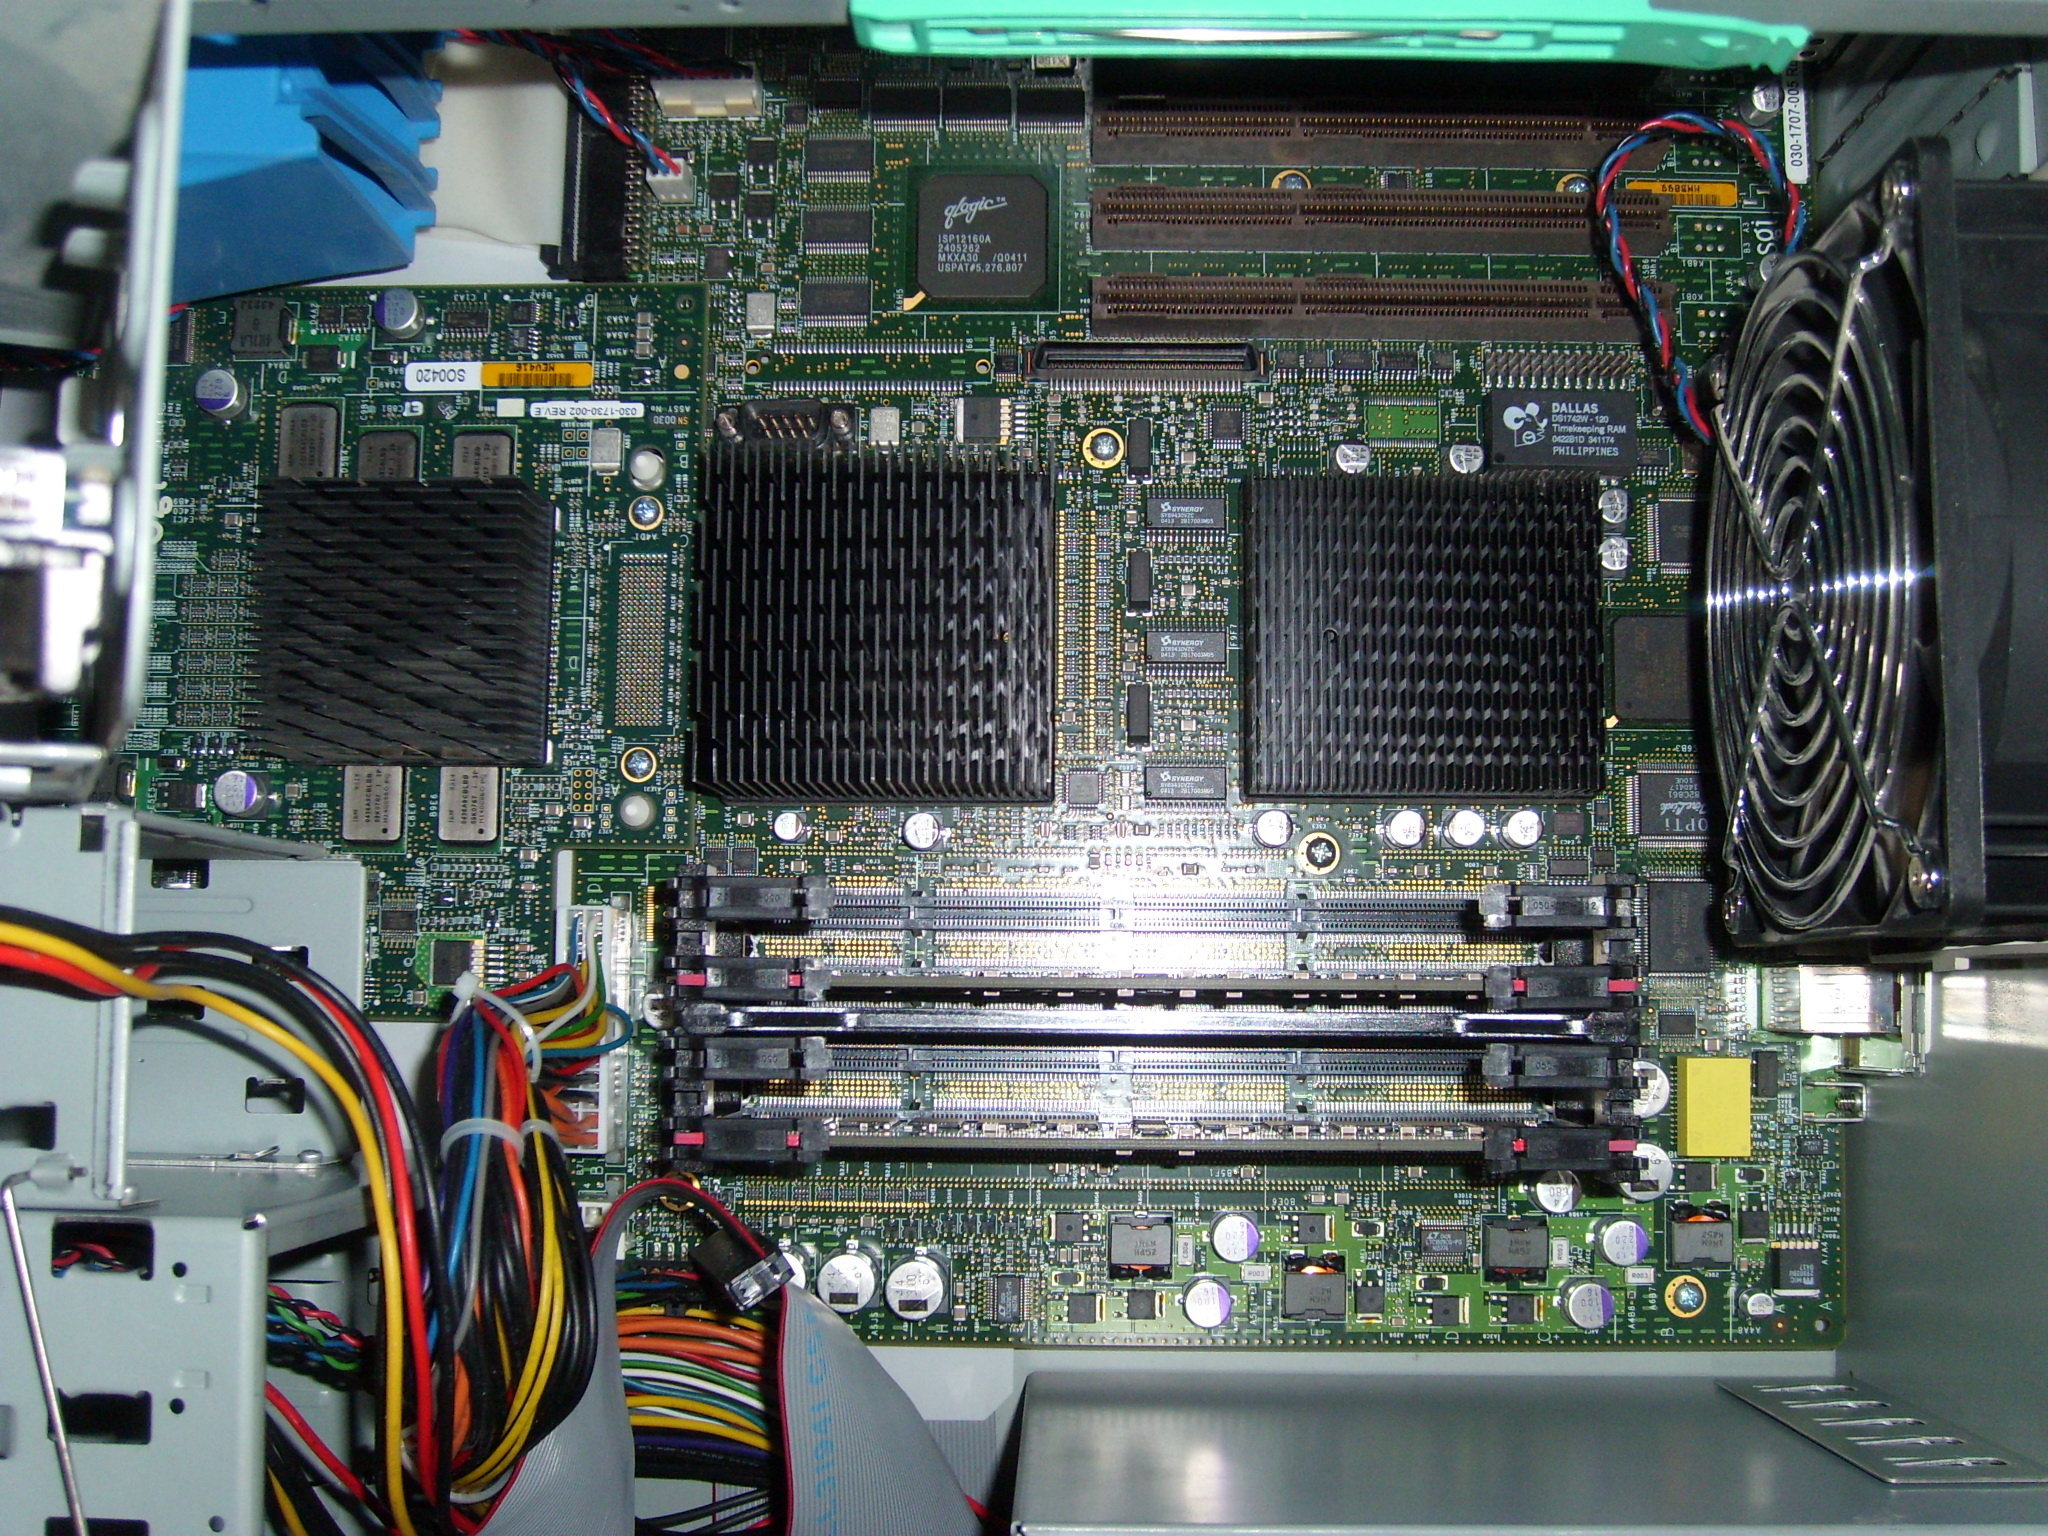
Here is another view of the same area from a different angle. The processor is
on the left, and you can notice it is on its own removable board, using a
compression connector to connect to the main logic board.
Immediately above the middle black heatsink, a connector looks like a DB9 serial port. This is another access to the L1 controller, with a direct serial connection (instead of the external USB port). Connect to this port at 38400 8N1, and here you go, you can issue L1 commands yourself, without the need for any SGI software or L2 hardware. Of course this isn't mentioned in the hardware guide...
Immediately above the middle black heatsink, a connector looks like a DB9 serial port. This is another access to the L1 controller, with a direct serial connection (instead of the external USB port). Connect to this port at 38400 8N1, and here you go, you can issue L1 commands yourself, without the need for any SGI software or L2 hardware. Of course this isn't mentioned in the hardware guide...
That last picture shows the graphics card, without its cover. The huge gray
heatsink totally dwarves the black ones! And the PCI card (the darker green
shape with the two white stickers on it) looks incredibly
small in comparison...
OpenBSD/sgi on Fuel
Porting OpenBSD to the Fuel was an interesting challenge. Public documentation
about the machine is scarce, if not non-existing. But it was known that this
design (IP35) was an evolution of the Origin design (IP27).
Although no operating system but IRIX was running on these machines, the best source of documentation turned out to be some contributions of IRIX source code to the Linux kernel, by SGI engineers themselves (part of the IP35 design was in turn reused for the Altix Itanium-based family, for which SGI contributed Linux support).
Reading through this code and taking notes helped a lot, but did not release me of tedious hours of tinkering with the machine, trying to tame it and get it run further.
The main difference between IP27 and IP35 is that the former only support two processors per node board, while the latter supports an extra set of two, for up to four processors per node. Apart from that, they use the same kind of components, and some new components which did not exist on IP27 systems, such as the PIC PCI-X controller used on the Tezro and Origin 350.
The first problem I faced was to get the PROM to boot my code. It took me a few experiments to figure out at which address the kernel should be linked (I actually found a hint of this address weeks later in a comment in the SGI-contributed Linux code, while I was much further in the game, fighting XBridge bugs).
Once I could get a kernel to boot, I quickly reached the point where the machine would boot an installation kernel (bsd.rd), but would hang when enabling interrupts.
A few bug fixes later, the kernel would start init, which would print 16 characters on the console and freeze. This was an obvious sign of interrupts not being processed correctly (16 characters meaning that a complete TX FIFO had been transmitted by the serial chip, which is now interrupting to ask for more data to transmit).
Mind you, the serial ports are part of an SGI-specific IOC3 chip. This is supposed to be a PCI device, but it conforms to the PCI specification as well as a car adheres to an icy road.
Among many surprises, that device can (and does...) use more than one interrupt. Yet it doesn't even implement the PCI interrupt register in configuration space... and doesn't advertize itself as a multifunction device anyway.
I eventually found a not-so-bad way to figure out which interrupt pins are used by the IOC3 device, and could run further.
A week or so later, I could configure the PCI slots and get the network card working, in addition to the onboard devices. This allowed me to witness the machine freeze while trying to install from the network. Weeks later, I realized that a bug in the DMA setup was causing data received from the network to overwrite the kernel image in memory. Few kernels can recover from this (-:
Many bugfixes later, the machine is now (late may) stable, with known caveats. The main problem left at the moment is that only the first memory bank will be used. Memory in the second bank needs proper DMA programming, and my code so far manages to paint itself in a corner when too much DMA is happening. (This eventually got fixed two years later, in april 2011).
Here is a dmesg of the machine at the moment.
And here are openssl speed -elapsed results:
This machine completes a make build with both /usr/src and /usr/obj on the local disk, in less than six hours and a half. This is roughly the same time as would take either an HP 9000 B2000 (400 MHz hppa with 1MB L2 cache) or a PowerMac G4 (400 MHz PowerPC 7400 with 1MB L2 cache). Both these machines are (as could be expected) behind in the openssl results, though.
Although no operating system but IRIX was running on these machines, the best source of documentation turned out to be some contributions of IRIX source code to the Linux kernel, by SGI engineers themselves (part of the IP35 design was in turn reused for the Altix Itanium-based family, for which SGI contributed Linux support).
Reading through this code and taking notes helped a lot, but did not release me of tedious hours of tinkering with the machine, trying to tame it and get it run further.
The main difference between IP27 and IP35 is that the former only support two processors per node board, while the latter supports an extra set of two, for up to four processors per node. Apart from that, they use the same kind of components, and some new components which did not exist on IP27 systems, such as the PIC PCI-X controller used on the Tezro and Origin 350.
The first problem I faced was to get the PROM to boot my code. It took me a few experiments to figure out at which address the kernel should be linked (I actually found a hint of this address weeks later in a comment in the SGI-contributed Linux code, while I was much further in the game, fighting XBridge bugs).
Once I could get a kernel to boot, I quickly reached the point where the machine would boot an installation kernel (bsd.rd), but would hang when enabling interrupts.
A few bug fixes later, the kernel would start init, which would print 16 characters on the console and freeze. This was an obvious sign of interrupts not being processed correctly (16 characters meaning that a complete TX FIFO had been transmitted by the serial chip, which is now interrupting to ask for more data to transmit).
Mind you, the serial ports are part of an SGI-specific IOC3 chip. This is supposed to be a PCI device, but it conforms to the PCI specification as well as a car adheres to an icy road.
Among many surprises, that device can (and does...) use more than one interrupt. Yet it doesn't even implement the PCI interrupt register in configuration space... and doesn't advertize itself as a multifunction device anyway.
I eventually found a not-so-bad way to figure out which interrupt pins are used by the IOC3 device, and could run further.
A week or so later, I could configure the PCI slots and get the network card working, in addition to the onboard devices. This allowed me to witness the machine freeze while trying to install from the network. Weeks later, I realized that a bug in the DMA setup was causing data received from the network to overwrite the kernel image in memory. Few kernels can recover from this (-:
Many bugfixes later, the machine is now (late may) stable, with known caveats. The main problem left at the moment is that only the first memory bank will be used. Memory in the second bank needs proper DMA programming, and my code so far manages to paint itself in a corner when too much DMA is happening. (This eventually got fixed two years later, in april 2011).
Here is a dmesg of the machine at the moment.
[ using 507368 bytes of bsd ELF symbol table ]
Copyright (c) 1982, 1986, 1989, 1991, 1993
	The Regents of the University of California.  All rights reserved.
Copyright (c) 1995-2011 OpenBSD. All rights reserved.  http://www.OpenBSD.org

OpenBSD 4.9-current (GENERIC-IP27) #1065: Sat Apr 23 20:07:50 GMT 2011
    miod@eyrieux.gentiane.org:/usr/src/sys/arch/sgi/compile/GENERIC-IP27
real mem = 2147483648 (2048MB)
rsvd mem = 20643840 (19MB)
avail mem = 2079637504 (1983MB)
mainbus0 at root: Fuel
cpu0 at mainbus0 nasid 0: R14000 CPU rev 2.4 600 MHz, R14000 FPU rev 2.4
cpu0: cache L1-I 32KB D 32KB 2 way, L2 4096KB 2 way
clock0 at mainbus0 nasid 0: ticker on int5 using count register
spdmem0 at mainbus0 nasid 0 dimm 0: 512MB DDR SDRAM registered ECC PC1600CL2.5
spdmem1 at mainbus0 nasid 0 dimm 1: 512MB DDR SDRAM registered ECC PC1600CL2.5
spdmem2 at mainbus0 nasid 0 dimm 2: 512MB DDR SDRAM registered ECC PC1600CL2.5
spdmem3 at mainbus0 nasid 0 dimm 3: 512MB DDR SDRAM registered ECC PC1600CL2.5
xbow0 at mainbus0 nasid 0: XXBow revision 2
xbridge0 at xbow0 widget 15: XBridge revision 2
xbpci0 at xbridge0 bus 0: 33 MHz PCI bus
pci0 at xbpci0 bus 0
isp0 at pci0 dev 1 function 0 "QLogic ISP12160" rev 0x06: irq 1, xbow irq 62
isp0: board type 12160 rev 0x6, loaded firmware rev 10.4.41
scsibus0 at isp0: 16 targets, initiator 0
sd0 at scsibus0 targ 1 lun 0: <QUANTUM, ATLAS 10K 18WLS, UC81> SCSI3 0/direct fixed t10.QUANTUM_111917541930
sd0: 17518MB, 512 bytes/sec, 35877972 sec total
scsibus1 at isp0: 16 targets, initiator 0
cd0 at scsibus1 targ 6 lun 0: <TOSHIBA, DVD-ROM SD-M1401, 1F09> SCSI2 5/cdrom removable
ioc0 at pci0 dev 4 function 0 "SGI IOC3" rev 0x01
onewire0 at ioc0
ioc0: ethernet irq 4, xbow irq 61
ioc0: superio irq 0, xbow irq 60
com0 at ioc0 base 0x20178: ns16550a, 16 byte fifo
com0: console
com1 at ioc0 base 0x20170: ns16550a, 16 byte fifo
iockbc0 at ioc0
iec0 at ioc0: 128KB SSRAM, address 08:00:69:10:54:96
nsphyter0 at iec0 phy 1: DP83843 10/100 PHY, rev. 0
lpt at ioc0 not configured
dsrtc0 at ioc0: DS1742W
ohci0 at pci0 dev 5 function 0 "Opti 82C861" rev 0x10: irq 5, xbow irq 59, version 1.0, legacy support
usb0 at ohci0: USB revision 1.0
uhub0 at usb0 "Opti OHCI root hub" rev 1.00/1.00 addr 1
xbridge1 at xbow0 widget 14: XBridge revision 2
xbpci1 at xbridge1 bus 0: 66 MHz PCI bus
pci1 at xbpci1 bus 0
odyssey0 at xbow0 widget 13: Odyssey device has not been setup by firmware!
vscsi0 at root
scsibus2 at vscsi0: 256 targets
softraid0 at root
boot device: sd0
root on sd0a swap on sd0b dump on sd0b
And here are openssl speed -elapsed results:
type             16 bytes     64 bytes    256 bytes   1024 bytes   8192 bytes
md2                397.77k      862.59k     1206.43k     1340.22k     1384.72k
md4               3038.31k    10572.88k    30006.93k    56058.23k    75374.34k
md5               2373.23k     8168.48k    22910.45k    41947.58k    55435.35k
hmac(md5)         2881.94k     9541.23k    25468.98k    43950.87k    56015.52k
sha1              2313.53k     7692.07k    19743.66k    32474.73k    40025.63k
rmd160             995.99k     2444.79k     4514.79k     5729.98k     6218.36k
rc4              48197.51k    55976.50k    58301.53k    58929.03k    59099.04k
des cbc          10476.48k    11178.67k    11351.42k    11395.76k    11397.73k
des ede3          3953.03k     4051.04k     4075.34k     4081.35k     4081.17k
rc2 cbc           6446.43k     6685.48k     6746.95k     6762.23k     6766.22k
blowfish cbc     17894.74k    19536.61k    20041.38k    20168.70k    20205.25k
cast cbc         12206.88k    13109.61k    13340.35k    13399.83k    13413.84k
aes-128 cbc      15667.17k    16594.19k    16867.06k    16934.30k    16950.66k
aes-192 cbc      13795.92k    14535.70k    14746.26k    14797.12k    14809.68k
aes-256 cbc      12356.77k    12931.90k    13096.85k    13137.03k    13146.48k
sha256            2133.24k     4972.56k     8839.23k    10993.27k    11832.71k
sha512            1908.64k     7830.54k    12894.19k    18792.53k    21679.81k
aes-128 ige      15971.20k    17650.82k    17838.77k    17841.60k    17993.71k
aes-192 ige      14203.54k    15277.27k    15463.21k    15484.90k    15675.03k
aes-256 ige      12654.50k    13516.71k    13668.84k    13736.89k    13811.78k
This machine completes a make build with both /usr/src and /usr/obj on the local disk, in less than six hours and a half. This is roughly the same time as would take either an HP 9000 B2000 (400 MHz hppa with 1MB L2 cache) or a PowerMac G4 (400 MHz PowerPC 7400 with 1MB L2 cache). Both these machines are (as could be expected) behind in the openssl results, though.